Saturday, March 28, 2009

Culture Highlight : Qing Ming Festival

Qing Ming Festival in Thailand

We have a lot of Chinese people living in Thailand. Well, actually, I'm one of the Chinese who considered myself an official Thai as well as an ethnic Chinese (many Chinese people esp the ones in my generation think that way. We love our country so much.) :-). Every year in early April, there's a very big festival for the Chinese community called Qing Ming (known among Thai person as "Cheng Meng") in Thailand.


The word Qing Ming means Clear and Bright Festival, is a traditional Chinese Festival usually occurring around April 5. Its name denotes a time for people to go outside and enjoy the greenery of springtime and also to tend to the graves of departed ones.

For the Chinese, it is a day to remember and honor one's ancestors at grave sites. Young and old pray before the ancestors, sweep the tombs and offer food, tea, wine, chopsticks, (joss) paper accessories, and/or libation to the ancestors.

Yesterday, I went to Saraburi, a province nearby Bangkok to pray for my ancestors. We left the house at 5 am in the morning to avoid traffic and also the heat from the sun! Our family prefer to start the Qing Ming a bit earlier than the official day to avoid BIG crowd and traffic.

We started off by paying respect to "Pae Kong" and "Tee Ti Pae Bor".


Outside the temple, there were many sellers. This one is the picture of traditional Chinese toy. This festival is for family to gather and have a celebration. In China, it is the official springtime, so people start to dine, sing, and dance.


This is a picture of one of the big graves. The fengshui master determines which location is the best for the grave of your ancestor. The proper location is believed to bring health and prosperity to the family.

People bring lots of food as part of the praying. Some family gathered and sat in front of the grave and ate there, just like a party with everyone in the family including their ancestor!
The stack of the orange and gold paper on the right hand is called "Gold & Silver Paper". People bring this to pray to their ancestor and will later burn it as a way to send money to passed away ancestor. Some people fold the paper themselves while some just purchase it.
People burn the paper to send 'the money' to their ancestors. Other people will also buy paper car, paper clothes, paper house, etc as they want to send those stuffs to their ancestors. We believe the passed away souls are still around so we love to continue to pay respect and take care of them.
My family didn't eat in front of the grave. We came back to the area nearby the temple where the temple provide vegetarian food for all visitors for free. My family donated to the temple to share the cost of the food. They were all delicious (though it might not look that appetizing in the picture :p)


As usual, my mom bought some fruits back home. This year, she bought ripe mangoes. This kind is my top favorite as it's not too sweet and the fragrance is really nice. The price is about $0.99/kilo (or $0.99/2.2Lbs). Cheap, right?

Thanks to wikipedia for being source of my reference.

Wednesday, March 25, 2009

A sneak peek into our store

Click to visit EggsR'Us store

Sunday, March 8, 2009

Egg Types

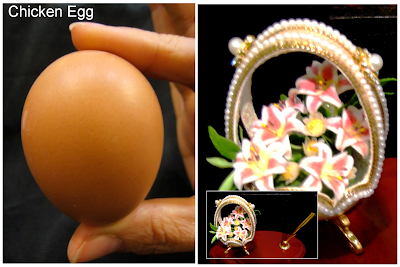
Someone once told me that eggs have a magical spell in that once you work with them you will be addicted to this hobby.  I must say that over the years I have become more obsessed with decorating eggs.  I work with all sorts of eggs ranging from the smallest quail eggs to the biggest ostrich eggs.  The eggs you see below are the ones that are easily sourced from specialty farms in Thailand.

Several weeks ago I met an interesting Etsian who is now my friend.  She has a pet parrot which regularly lays eggs and that she has so many of them that she feels sad everytime that she has to throw them away.  She offered to airmail her parrot's eggs to me for free so that I could use them in my craft.  Her generosity touched me and I knew that she was a person with a kind, compassionate, and loving heart.  These small acts of kindness keeps me motivated to do things that I love.


Saturday, March 7, 2009

Unforgettable Egg Art Lesson

I enjoy making eggs more than trying to sell them. During my free time I offer lessons to show people how to use my techniques in making egg art. The pictures below are interesting because it gives you a visual of how the egg is transformed into a beautiful work of art. The magic will happen right before your eyes. This course is called the "Decorated Goose Egg with Acrylic Paint" and its the one I like to start off teaching....sort of like Egg Decorating 101. During one of my classes I met Belle who turned out to be a new found friend.


1st Picture: So I said that I would show you from start to finish. Well, let me take that back and show you what the finished egg looks like. The pictures you will see here are Belle's egg art. Belle has a natural talent for handcraft art and her interest are vary from scrapbooking, jewelry making, handicrafts, and now egg art.


2nd Picture: Here is a blown & thoroughly cleaned goose egg. This is a very important and time consuming process. The egg has to be sanitized and sun dried for several hours before it is safe for decorating. Sun drying is the most effective way to clean an egg and luckily Thailand has plenty of heat and sunshine! Belle started off by scrubbing the egg shell with sand paper to increase the stickability of the paint. The paint can last decades if you use the proper technique.


3rd Picture: Simple tools are used to carefully measure and draw a line so that we can cut the egg symmetrically.


4th Picture: Belle is very good at being precise. This step can be very difficult for many studens as drawing a straightline on a round-shape egg is not easy. If the line is not straight and centered then the egg won't open up nicely.


5th Picture: An Electric saw is preferred to a hand saw for its precision and low crack rate. Belle was amazed to learn that the egg shell is much stronger than what it seemed to be. The mother nature designed the egg to be a barrier of protection for creating life!


6th Picture: Eggs were cut opened in two halves.


7th Picture: I always teach my students to take extra steps for sanitization to ensure maximum hygiene. Use alcohol or nail enamel remover and rub over surface of egg shell.


8th Picture: Lightly scrub the edges of the eggs with sand paper to smoothen out the harsh lines.


9th Picture: Carefully attach a hinge.


10th Picture: Painting Time! The acrylic paint was mixed into a small bowl. Belle chose pearlized white paint which is also my favorite color for decorated eggs.


11th Picture: Belle applied layers of paint onto the shell. She was very good at painting and also very patient to wait until each layer dry completely. If you are not patient and apply the next layer too quickly then the finishing will be rough and uneven. It was during this waiting period that I had the chance to learn more about Belle and her hobbies. I was impressed that she was able to transfer her skills in jewelry design into egg art. My classes gives me the opportunity to make new friends.


12th Picture: Here the inner egg was cushioned with velvet-like cloth. This step requires a gentle hand and good eye to make the cloth evenly wrinkled and distributed.


13th Picture: Beautiful cushioning.


14th Picture: The opening was covered with a gold thread.


15th Picture:
Now the pearl-like beads were glued as a second layer at the opening. Belle suggested that we use real gemstones in this step! OMG! I think this will be way too expensive!!


16th Picture: A short stand was chosen out of the many designs that I had in stock.


17th Picture: Belle wanted to add a personal touch to this egg so she attached her mother's bow pin as a center piece of the egg! This is so creative and so green... re-use and recycle! I considered the egg decorating to be done at this point however, Belle was determined to B L I N G this egg.


18th Picture: Side view of Belle's work. Gorgeous!


19th Picture: Belle was very excited and proud with her newest creation. I remembered I told Belle that it must be the destiny that brought us to meet each other. We have a lot in common and we also share the same thinking about culture and art. We both want to teach people the art of egg decorating to keep this alive for generations to come.


20th Picture: This is her fully bejeweled egg. Even now, she still tries to convince me to use genuine gemstones on my decorated eggs. She thinks my art is precious and deserves precious gemstones! What do you think?


When we finished the class and were about to leave the store, an Egyptian customer walked in. My English was not very good so Belle helped me take care of this customer and managed to help me sell 3 eggs in my store!! I offered her a commission but she refused. I was very thankful to her. We continued to keep in touch as friends. Until a few months later, she suggested me to open an online store on Etsy! I told her I only have minimum skill on English language and computer. So she offered to help me with communicating in English. This blog could not have happen without her assistance. I never imagined that we could have an online store that would reach out to the international community. Who would have thought that one of my students would become a friend and business partner... I believe in destiny.